 Have you experienced Apple's new amazing resource for teachers called Apple Teacher Learning Center? If you have, then you probably already finished or are working towards your Apple Teacher recognition. If not, keep reading and find out how you can expand your Apple knowledge and become an Apple Teacher. Apple has always had a place on their website dedicated to Education highlighting the awesome things teachers and schools across the world are doing to transform education with Apple products. Recently, Apple has released a more dedicated place for teachers to learn more about using Apple products in the classroom. The Apple Teacher Learning Center can be found at appleteacher.apple.com. When you visit the site, you will first need to create an account with your Apple ID. Once you get signed in you will see that Apple has divided their resources into different categories. You can get inspiration for new lesson idea, find learning resources for teachers, find out about Apple's new initiative "Everyone Can Code", and you can dive into the collections for iPad and Mac. Choose the collection you want to learn more about. Each section is broken into 8 different categories or badges as they refer to it. When you click on one of the badges, you will be taken to resources specific to that badge. For example, if I want to earn the Pages for iPad badge, the resources there will teach me more about the Pages app. Each of the badges has its own Starter Guide you can download into iBooks. These Starter Guides are AMAZING! Really! They are for those that have never used the apps before and those that have been using the apps forever. There is something in there for everyone. Each Starter guide gives step by step instructions and activities for learning how to use the app. Even if you don't want to earn your Apple Teacher recognition, you should go to iBooks and search for Apple Starter Guides for Teachers or click the links below. They really are one of the best tools I have used! After you go through the Starter Guide, you can complete a 5 question quiz to test your knowledge of that device or app. If you pass, you earn a badge. After you collect all 8 badges for your chosen device, you become recognized as an Apple Teacher. Complete with your own digital badge and everything. We have several teachers in our district that have already completed all 8 badges for either Mac or iPad and many more working on their badges! Download your starter guides below to start your journey today. Download the Apple Teacher Starter Guides Right NOW!
0 Comments
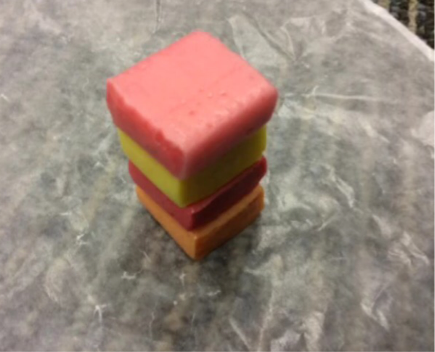
 I am very excited to share this idea from our 4th Grade teacher Mrs. Melissa Vannoy. She has allowed me to write about this lesson on my blog but she is the brains behind this awesomeness! In 4th grade, students must compare the phsyical properties of rocks. Mrs. Vannoy started this learning goal with a fun rock cycle activity she found on Pinterest involving Starburst candy. Using a little heat and pressure, the students transformed their candy squares into metamorphic, igneous, and sedimentary rocks.
The learning didn't stop there. Throughout this rock cycle process, students used their iPads to document the steps with pictures. Later, Mrs. Vannoy asked them to create an Adobe Spark video to share what they learned about the Rock Cycle. Here were her guidelines:   As you can see, she gave them the very basic components of the presentation and let the kids go from there. Together with their partner, each student created an Adobe Spark video complete with images of their starburst rocks and explanations of what they did to create each rock. Once the video was done, each group played it for Mrs. Vannoy giving her time to check the accuracy of their explanations and the quality of their work. Once Mrs. Vannoy approved the videos, each group created a QR code that linked to their video. Yes, the students created these. It was not another thing for the teacher to do. They simply copied the link to their Adobe Spark Video and pasted it into the QR code generator, qrstuff.com. Once their QR code was created, they imported it into Pages and added a title.
Wow! That seems like a lot of steps right? It always does when it is all typed out. The knowledge gained from this activity was worth every second spent on it. Not only did they learn some cool techy tools but the bigger picture is that they processed their rock creating starburst activity. It was no longer just a fun thing they did in science class but something they had to think through. They had to process the what, the why, and the how of the rock cycle. I am pretty sure each one of these kids can probably tell you exactly how each type of rock is formed now! Check out their finished products by clicking on each image below.*Note that when you click on each video the Adobe Voice website says was produced by me. I can assure you, I did not create these. To have an Adobe ID, the students must be 13. Our 4th graders are not. So, they all login to the same account using an email address setup under my name. This also helps the teachers when they go to grade because they can login to that same account and access each Adobe Voice Project.  This is one of my favorites. I love how the students took it upon themselves to create a video book complete with chapters!
 I am in love with the new iOS 10 and macOS Sierra update that allows for the use of a Universal Clipboard. What in the world is that do you ask? Well, let me explain this awesomeness to you.
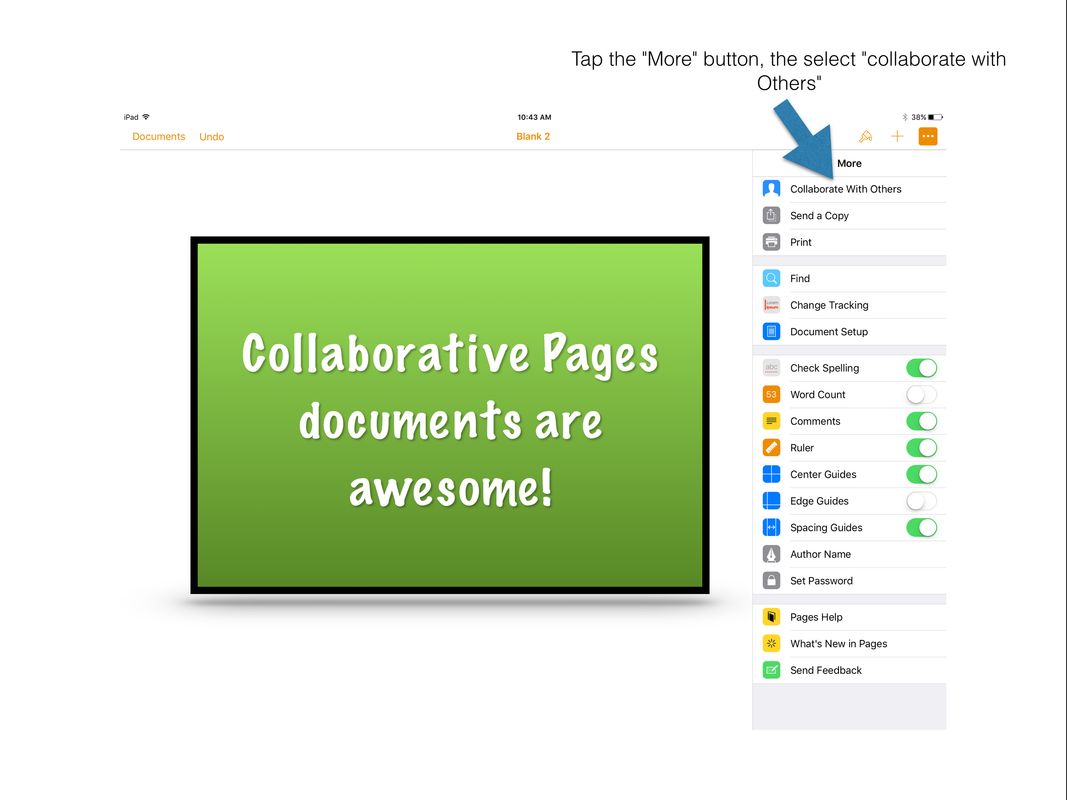
Are you ever working between your MacBook and your iPad and have to Airdrop or Email yourself a picture or text from one device to the other? While it is not difficult, it is still kind of annoying because it is just one more step you have to do to get whatever it is you may be working on finished. Universal Clipboard changes all of this. You can now copy something on your MacBook and paste it onto your iPad. It is as simple as that. You can also go the other way, copy something on your iPad and paste it onto your Mac. For example, I am working on a Keynote presentation. I wanted a slide from an older Keynote on my iPad. I tapped the slide, selected "copy". Then on my MacBook, I used "Command + V" to paste that slide in. Huge time saver! Yet another reason, I love Apple.  Be excited people! You can now collaborate on a document with others in the Pages, Numbers, and Keynote apps for both iOS and Mac. Yes, I know, Google has been doing it forever, right? Well, the key difference here is that now students can collaborate within the Pages platform that has endless opportunities for creating. Have you tried to work with images or videos in Google Docs? If so, then you know the frustration of not being able to get that image exactly where you want it. So yes, being able to collaborate within Pages, Numbers, and Keynote platforms is a big deal! However there are some things to think about before getting started. Follow the steps below BEFORE you try using collaborative documents with your students to save yourself some headaches. 1. You must be updated to iOS 10 on your iPad or MacOS Sierra on your Mac. Update, update, update. I feel like I say it all the time but if you want to use this awesome new tool, you really need to update your devices. Not sure if you are updated? If you need help updating check out these link from Apple support: iOS 10 Update or MacOS Sierra Update.  2. Update to the current versions of Pages, Numbers, and Keynote apps. Check your App updates in the App store. Make sure Pages, Numbers, and Keynote don't need to be updated. You will not be able to see the collaboration tools in the older versions of these apps. 3. You must be signed in to iCloud and use iCloud Drive. The collaboration tools in these apps, uses your iCloud account and iCloud Drive must be turned on. You can find this in settings under "iCloud".  4. Within each of the apps, you must enable the use of iCloud. In settings, go to each of the Apple apps you want to collaborate in and make sure the "Use iCloud" option is switched on. The upside of this is that all of your documents will be saved to iCloud and accessible on any of your devices. The downside is if you have lots and lots of documents in these three apps, it will use up your 5GB of free storage in a hurry. You may have to upgrade your iCloud storage.  6. Share your document! Sharing your document is very easy. Click on the new and improved "More Tools" button in the top right corner of your Pages screen and select "Collaborate with Others". Then you choose how you want to send your invitation. I like to send via email because our students don't have access to iMessage or Twitter. If I copied the link which is a great way to share, I would then have to email it to the person I'm sharing with anyway.
7. Create something awesome together! Yes, it seems like a lot of steps when I list them all out like this but, the setup process is totally worth it. The possibilities are endless when you are creating together in Pages. You have all of the awesome features of Pages combined with the power of collaboration. The 8th graders in Mrs. Hamlin's Social Studies class loved working with the collaborative documents. They liked the way they could both be working on it at once so they weren't just sitting around waiting for one partner to do all the work. They say two heads are better than one. What will you create together?   I've started and stopped the blog creating process approximately 52 times. It is something I know I want to do, yet it always gets pushed to the bottom of my to-do list. So here I am, starting again. My goal is to share powerful, practical strategies for integrating technology into the classroom.
Technology is a powerful thing. When we put that power in the hands of our students they have the opportunity to transform their learning from something they 'have-to' do to something they are passionate about. I am passionate about helping teachers give students these types of learning opportunities. I know what you are thinking right now. "Technology is great, but I just don't have time." or "But I don't know how." or "But what if the students know more than me." or "But the students spend too much time on devices." Really, there is a multitude of "buts" that could be used. Believe me, I've been there and I know many other teachers who have been too. As a former classroom teacher I can say that I had zero time, zero energy, and zero ideas for how to get started. This blog is me overcoming my "but I don't know how to start my blog" fear. My challenge to you is to forget the "buts" and just give it a try. My goal is to help teachers overcome the "buts" in their world keeping them from utilizing a tool that can transform teaching and learning in their classrooms. If there is something you don't know how to do, just ask! It will give me some great blogging material and hold me accountable for keeping up with this whole blog thing. |
This blog is a collaborative effort between the Technology Coaches at the Palmyra R-I School District and the Knox County R-I School District. We are passionate about integrating technology into the classroom and hope we can inspire others to engage their students with technology.
Archives
April 2018
Categories
All
|


 RSS Feed
