|
By: Jennifer Orton Podcasting has always been a mystery to me. What do you say? How do you record it? Where do you publish it? Even more of a mystery to me when I thought about how to use it with students. That is until I came across the iPad app called Anchor. This app makes it easy for teachers and students to start creating podcasts in a snap. Why Podcasting?Before beginning anything new, think about your why. Why would we want to introduce students to podcasting in the classroom? Student Voice- Podcasting allows students to share their ideas with others. Voicing their learning and their ideas empowers students to take ownership of their learning. Collaboration- Working together to figure out what to record builds collaboration skills. Writing and Speaking Skills- It is important that students be able to articulate their thoughts. Podcasting gives them a way to do this. Not only do they have to write down their ideas about what they are going to talk about, they also have to develop their speaking skills to make sure those ideas are understood by their listeners. Authentic Audience- Students will always work harder at something they know will be seen and/or heard by someone other than their teacher. Podcasting gives students an authentic audience. This empowers students to see beyond the grade and take a close look at how they can impact the learning of others.
What Should We Record?The recording possiblities are endless. Let your students help you come up with episode ideas! Here are a few ideas to get yoru creative juices flowing!
Weekly Learning Updates- Have students create a weekly recording of what they have learned throughout the week. This is great for parents to get a snapshot of the things going on in the classroom instead of just reading the teacer's point of view in the weekly newsletter. Book Reviews- Create a podcast where students record reviews of books they have read. Share Writing- The world can be your author's chair. Students can share the stories they are writing in class via the podcast. Interviews- Have students practice their speaking and listenting skills by starting a podcast featuring interivews. They can interivew classmates, teachers, community members, and more! What will you have your students podcast?
0 Comments
Addy Gottman  Recently, in a conversation with a co-worker, I was reminded of how beneficial mind mapping tools are in the classroom. From planning to organizing, collaborating to teaching, and assessing to inspiring they have a use in all curricular areas. The mind mapping tool I want to showcase in this post is MindMeister. I first became introduced to MindMeister not as a teacher but as a graduate student. Completing my master's degree entirely on-line required me and other students to collaborate using many Web 2.0 tools. The tool we turned to most was MindMeister. MindMeister works well as a collaborative mind mapping tool, but it can also be used by singles users. Students and teachers can create a mind map for the organization of information, to showcase knowledge, studying, creating presentations, and taking notes. The options are limitless. Once the creation of a mind map has begun with a heading/title, branches are created for sub topics and ideas. Branches are added easily with the click of a button. Descriptions and details are beneficial , but my favorite option is the ease of embedding information. Links to videos, websites, articles, and charts are examples of embedding options. Color coding and icons add customization to the map. MindMeister has a basic free version and upgraded options are available. The free version allows for three saved mind maps but does has limited features. There are pricing options available for schools or individuals to purchase the upgraded packages.  By: Jennifer Orton
Of course, I am sure there is so much more to Twitter than what I've listed here. However, these are my take aways from the Twitter Challenge this week. I encourage you to create a Twitter account and see what is all about. If you already have a Twitter account, I encourage you to get more involved!
By Jennifer Orton Looking for something new, fun, and different to try in your classroom? Check out the app Ditty. This app allows you to type in anything you want, and Ditty turns it into a song! This song can be downloaded to your iPad and imported into any other app that allows imports from your camera roll. Check out the example below. It isn't fancy but it will give you an idea of what Ditty does. Yes, it is fun and yes, it can be used in your classroom. Here are 3 ways you could incorporate Ditty today!
1. Have students create a musical exit ticket. 2. Give a musical book talk with music that matches the theme. 3. Create a ditty with a catchy song and/or rhyme to help remember an important fact! The challenge with using Ditty is that students only have 60 characters to work with. So they really have to choose their words carefully! Ditty not only allows you to personalize your text and your song, you can also add your own photos and videos. What will you create with Ditty? Share your ideas below.  by Tracy Fountain I hate powerpoint presentations. To be more specific, I hate sitting through them, as the presenter reads off of each slide. As a teacher, I have seen the shoulders of students slump as they realize they have to sit through another presentation. That all changed, though, when I discovered Pear Deck. Pear Deck allows you to create interactive presentations. The students join the presentation by entering in a code and it shows up on their ipads. There are various slides you can choose from: warm-up slides, where you can ask what they already know about the topic, and they answer from their ipads; reflective slides, where they show what they learned; and exit ticket slides, which shows how confident they are in knowing the material. In addition, custom slides can be made to ask various questions. Even better, they can do it anonymously. I was hooked as soon as I used it. However, I didn’t really want to make another slideshow when I already had them made in Google Slides. That’s when I discovered there is a Pear Deck Add-on that allows you to turn ANY Google Slide into a Pear Deck. Amazing! To get it, just open a Google Slide and click on Add-ons. Then, type Pear Deck into the search bar. Once you have it installed, you can choose the add-on and add the various slides. When you’re ready to present, click on Add-ons again and choose “Present with Pear-Deck.” Convenient? Yes. Cool? Definitely. The most amazing outcome that I’ve seen, though, is the engagement. The kids love to share their answers, and this way, you can hear from every student. When you’re ready to show their answers, you just click on the box at the bottom and the student responses come up. Pear Deck is just another tool in the technology toolbox that is making it easier to hear from every student. 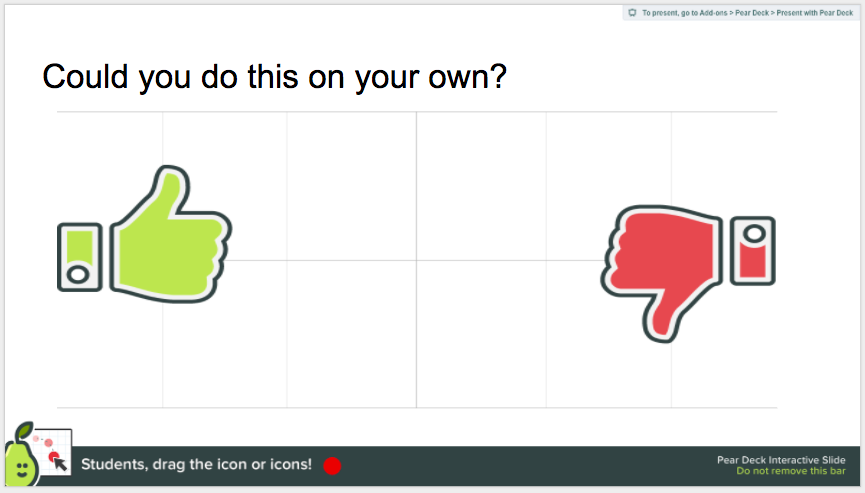  by Addy Gottman As a seventh grade math teacher, I am constantly searching for online formative assessments that take very little work on my part, are user friendly, and also provide me with loads of data on student progress. In addition to my wants , the assessment tool also has to be engaging for my students. I have found that Quizizz fits that bill. Quizizz is an online assessment tool and app. It has both a browser based option and student app for the iPad.
My students love Quizizz (I think as much as I do). Students join a game with a code, provide a user name and then the site provides them with a fun avatar. In my classroom, I use my computer and TV to project live results as the entire class works simultaneously on the quiz. Students are given feedback on their progress after they complete each question and then a final ranking at the end of the quiz. Quizizz keeps the students engaged by making it a competition, but it also holds them accountable for getting the answer correct. Scores are based both on accuracy and speed.
By: Jennifer Orton I enlisted a little help with my blog post this week. The Knox County R-I S.W.A.T. (Students Will Advance Technology) team was super excited about the release of iOS 11 and all the new features that were added! During our time together over the past few weeks, they each selected their favorite iOS 11 feature and used the new screen recording tool from the customizable control center to record tips for using the new tool. Take a look at each video below. Then comment... what is your favorite iOS 11 feature and how could you use it in the classroom?
This year at our school we have the privilege of having two full green screen rooms for students and teachers to use. No longer do we have to setup and tear down the portable green screen equipment. Creating a green screen project is now as simple as popping over to one of the green rooms and recording! Our setup is rather simple. A green wall, some green fabric, lights, the app Green Screen by DoInk, and of course our favorite movie editing app, iMovie. I am always excited when another group starts a green screen video project and asks me to help. Along the way, I have discovered a few things that make the quality of the video dramatically better. Below are my tips for creating a green screen video project. 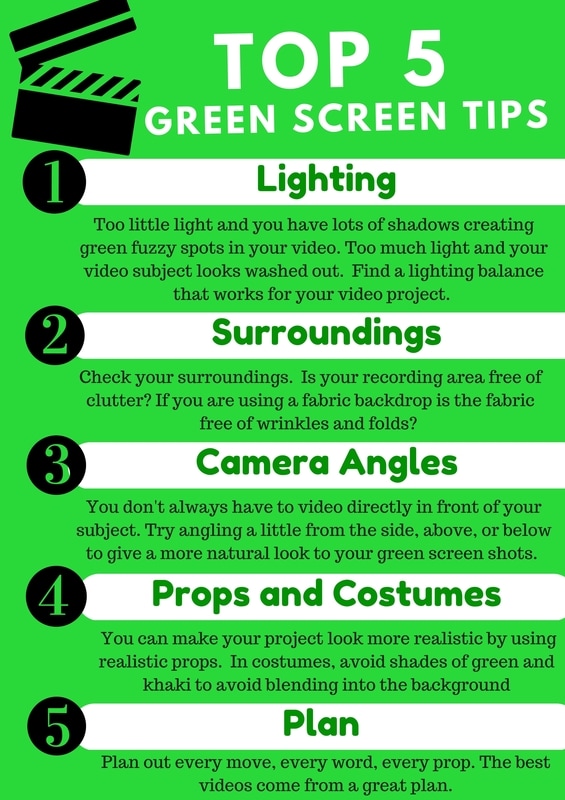 One of my favorite green screen projects is an 8th grade Lewis and Clark video journal. I love every part of this project. The research, the planning, the casting, the directing. A lot goes into a small 2-3 minute video. The students build important skills like communication and collaboration when they are seeking out help for their video in the form of actors or videographers. Take a look at this sample project below. Long story short students and teachers enjoy using the green screen. I feel that it has opened many creative doors for our students and they teach me something new about it all the time. Stay tuned for future posts about how to use the DoInk Green Screen app!
 Have you ever wanted students to gather ideas or information collaboratively? Chances are you have used Post-it notes or good old chart paper to do so. Wether you are brainstorming, note taking, or checking for understanding, Padlet can be a powerful tool for your classroom. Padlet is a free tool that can be used in both a web browser or iPad app. I use both the browser version and the app version. I love that you can sign up and have your kids sign up with their Google email accounts. This means they won't have an extra login to remember. So how does Padlet work? Imagine a virtual whiteboard. However, it is so much more than that! This whiteboard will allow you to add sticky notes, organize, add links, videos, and other documents. Once your notes or documents are added you can then discuss them with an endless number of collaborators. Padlet baords can be shared via email, qr codes, or you can embed them into yoru website or blog. You can see mine embedded below! Whenever implemeting a new tool, your next question should be "how does it make learning better?" My answer to that for Padlet is that it allows students to collaborate in a way they can't without the technology. Yes, we could post sticky notes on the wall to brainstorm ideas. But with Padlet, we can collaborate from any device, any where and the resoures we can share with one another are endless! Can you share a video or a website on a sticky note? Tools like Padlet have an unlimited number of ways they can be used. Below I have listed five ways you can use Padlet in yoru classroom right now. It is very easy to setup and share!
Imagine this with me.... You are in the middle of an amazing lesson and you decide to turn on your Apple TV to Airplay the most awesome student work you've ever laid your eyes on. You turn the projector on and it happens. A bunch of movie titles appear before you can get your iPad connected. From the back of the room you hear a student say "Are we watching a movie today?" or another student says "Suicide Squad! I love that movie." And then the discussion starts about which movie was best and who has seen what. Now, you spend the next few moments reigning them back in to the lesson. If you have an Apple TV in your room, this or something similar has probably happened to you at one point or another. There is a way to prevent this derailment from your amazing lesson plans. Let me introduce you to the Conference Room setting. The Conference Room Setting allows you to set a static picture to be displayed when you turn your Apple TV on. Yay! No more distracting and/or inappropriate movies to disrupt your class. When you turn on the Conference Room Setting, you select the picture you want displayed and then restart the Apple TV. When the Apple TV turns back on, you will see the picture you selected along with information about how to connect to your specific Apple TV. For specific directions on setting this up for your Apple TV, watch the video below. |
This blog is a collaborative effort between the Technology Coaches at the Palmyra R-I School District and the Knox County R-I School District. We are passionate about integrating technology into the classroom and hope we can inspire others to engage their students with technology.
Archives
April 2018
Categories
All
|


 RSS Feed
